Fix a Leaky Faucet Using Only Hand Tools
A leaky faucet might seem like a minor annoyance, but every drip wastes water and raises your utility bills. Worse, it can signal wear and tear inside the fixture that will only get worse if left alone. The good news is, you don’t need to be a licensed plumber or haul out a pile of power tools to take care of it. I’ve found that it’s totally possible to fix a leaky faucet using only hand tools, and I’ve done it more than once using nothing more than a wrench, a screwdriver, a cloth, and a bit of patience.
Whether it’s a kitchen sink, bathroom basin, or outdoor tap, fixing a leak at the source is one of the most satisfying DIY jobs you can take on. Not only will you save money, but you’ll also gain confidence in tackling future home maintenance challenges. I’ll walk you through exactly how to fix a leaky faucet using only hand tools—from diagnosing the problem to getting it working like new again.
Start by Identifying the Type of Faucet
Before pulling anything apart, I take a close look at what kind of faucet I’m dealing with. Most faucets fall into one of four basic categories:
- Compression faucets – Older style with separate hot and cold handles; they use washers.
- Ball faucets – Single-handle design with a rotating ball inside.
- Cartridge faucets – Can be single- or double-handle, with a replaceable cartridge.
- Ceramic disc faucets – Modern and durable, using ceramic cylinders to control flow.
Each design has its own quirks, but most can be repaired using similar hand tools. When I need to fix a leaky faucet using only hand tools, the first step is matching the method to the type.
Gather Your Tools and Supplies
Every time I prep for a faucet repair, I gather these simple hand tools:
- Adjustable wrench
- Phillips and flathead screwdrivers
- Allen wrench (for single-handle faucets)
- Slip-joint pliers
- Plumber’s grease
- Replacement parts (washers, cartridges, or O-rings)
- Towel or rag
- Bucket (to catch water)
That’s it—no power tools, no high-end gadgets. You don’t even need to cut pipes or mess with complicated fittings. Just a handful of tools you probably already have in your toolbox.
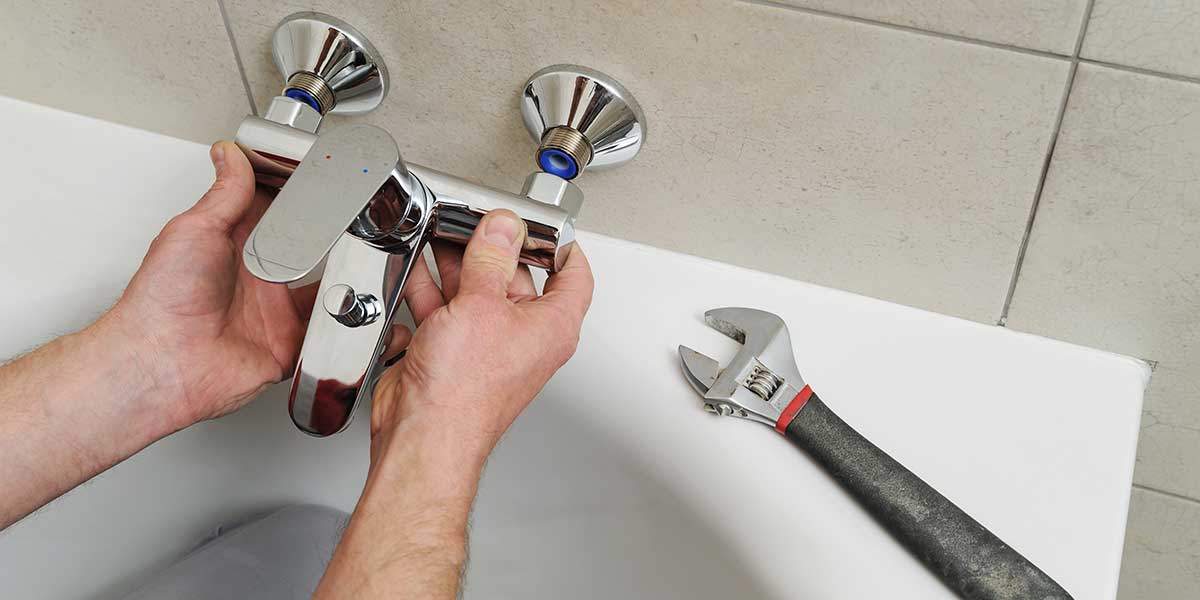
Shut Off the Water Supply
No matter which faucet I’m fixing, I always start by turning off the water supply. The shutoff valves are usually under the sink—one for hot and one for cold. I turn them clockwise until they’re tight, then I test the faucet to make sure the water’s off.
If your faucet doesn’t have shutoff valves nearby, you’ll need to shut off the main water line to the house. It’s an essential safety step, and it avoids a mess once you take things apart.
I also plug the drain using a rubber stopper or an old rag. Small parts can easily fall down the drain during the repair, and I’ve learned to avoid that the hard way.
Disassemble the Faucet
Once the water is off and the area is protected, I start taking the faucet apart. The process depends on the type of faucet, but in general, I remove the decorative cap (if there is one), then use a screwdriver or Allen wrench to loosen the handle.
With the handle off, I can access the cartridge or stem. This is where I use my wrench to gently loosen the retaining nut. I’ve learned to go slow—older faucets can corrode, and forcing them can crack the housing. A few turns with the adjustable wrench usually does the job.
If the faucet is a compression type, I remove the stem completely and look for worn washers or O-rings. For cartridge or ceramic disc faucets, I pull out the cartridge or disc and inspect it for signs of wear, scaling, or cracking.
Inspect and Replace Faulty Components
When I fix a leaky faucet using only hand tools, it’s usually because one small part is worn out. Common culprits include:
- Rubber washers – Found in compression faucets, these wear down over time.
- O-rings – Small rubber rings that create seals in various faucet types.
- Cartridges or discs – If these are cracked or warped, they won’t seal properly.
I take the worn part to a hardware store to get an exact replacement. Matching the part is critical—especially with cartridges, which vary widely by manufacturer.
Once I have the new part, I clean the inside of the faucet body using a cloth and a little white vinegar if there’s mineral buildup. I coat the new washer, cartridge, or O-ring with plumber’s grease before inserting it into place.
Reassemble the Faucet
With the new part installed, I reverse the disassembly process. I screw the retaining nut back on carefully with my wrench, reinstall the handle with the screwdriver or Allen key, and make sure everything fits snugly but not overly tight.
I remove the drain plug or rag, then turn the water supply back on slowly. With the faucet reassembled, I test it thoroughly by turning it on and off, checking for leaks around the base, spout, and handle. If everything stays dry and the water flow is normal, the job is done.
Troubleshooting Common Issues
Sometimes the leak doesn’t stop immediately after the first fix, and I’ve had to troubleshoot a few times before getting it right. Here’s what I usually check:
- Still leaking at the base – The O-ring might not be seated properly.
- Dripping from the spout – The cartridge or washer could be installed upside down or misaligned.
- Handle feels loose – The retaining screw may not be tight enough.
Even when a fix doesn’t go perfectly on the first try, I remind myself that I’m still saving money and learning valuable skills. And the second attempt is always faster and smoother than the first.
Preventative Maintenance Tips
After I fix a leaky faucet using only hand tools, I take a few extra steps to keep it from leaking again too soon:
- Clean aerators – Mineral buildup can cause back pressure and leaks.
- Don’t overtighten handles – Forcing them can wear out internal seals faster.
- Inspect annually – I make it a habit to check all faucets for signs of slow leaks.
Also, I write down the make and model of each faucet in the house, along with the type of cartridge or washer it uses. That saves me time when I need to make future repairs.
Cost Comparison
One of the best parts about handling this job myself is the savings. Here’s a rough breakdown of costs:
- Replacement washers or O-rings: $2–$5
- Replacement cartridge: $10–$25
- Plumber’s grease: $3–$6
- Total: Usually under $30
Hiring a plumber for the same fix could run $100 or more, depending on your area. And that’s not counting the wait time for someone to come out. Learning to fix a leaky faucet using only hand tools isn’t just about convenience—it’s about long-term savings and independence.
Benefits Beyond the Repair
Every time I take on a small repair job like this, it reminds me why I enjoy DIY work in the first place. Fixing a faucet is quiet, focused, and tangible. It takes less than an hour, and the payoff is immediate. No more dripping. No more wasted water. No more nagging noise in the middle of the night.
More importantly, it builds the kind of confidence that carries over into other parts of home improvement. Plumbing, electrical, carpentry—it all becomes more manageable once you realize that most fixes just require patience and basic tools.
Final Thoughts
Learning how to fix a leaky faucet using only hand tools is one of those essential skills that every DIYer should master. It doesn’t take much—a few simple tools, a replacement part, and a little bit of time. Whether you’re dealing with a constant drip, a loose handle, or low water pressure from buildup, the solution is usually straightforward.
I’ve saved time, money, and frustration by handling faucet leaks myself, and the process has only gotten easier with practice. It’s a task that rewards care and attention, and it leaves your home in better shape than it was before you started.
So next time you hear that familiar dripping sound, don’t reach for the phone. Reach for your wrench. You’ve got everything you need to fix a leaky faucet using only hand tools—and the satisfaction that comes with doing it yourself is just an added bonus.